Set up a federated identity provider on Azure using Active Directory and ADFS 2.0
From my archive - originally published on 24 November 2013
Federated identity is easy enough to set up using Azure. The Access Control Service provides a federation broker that is free to use while adding an identity provider based on Azure’s Active Directory service is very straightforward. The problem is that you have very limited control over the interface and branding. You are left with a thoroughly Microsoft-flavoured experience which feels rather disjointed as you are handed off to a completely different site to login.
This hand-off may be something users are getting more used to in a federated world, but many would at least prefer the option of a fully integrated experience. Jumping over to an external identity provider should be a user choice, not something that is asserted on them without explanation.
The recently released Premium version of Azure Active Directory now allows you to re-brand aspects of the login experience but this only provides for fairly superficial changes. Features such as password reset and the access panel have Microsoft’s stamp on them and you cannot change their appearance or behaviour. The service seems very much geared towards facilitating internal corporate SSO where an obvious hand-off to Microsoft is less of a issue.
The only way to fully control the user experience is to run your own identity server. There are numerous open source options for identity management (Thinktecture’s Identity Server is worth a look) but the simplest solution may be to set up your own Active Directory domain in Azure and use ADFS 2.0 for federation. This is not as daunting as it may sound – this walkthrough explains how it’s done.
Pre-requisites
To complete this guide you will need the following:
- An active Windows Azure account – a 90 day trial account will be sufficient
- Visual Studio 2012 to create a claims-aware website.
- The Identity and Access Tool extension for Visual Studio 2012 should be installed. This is available here: http://visualstudiogallery.msdn.microsoft.com/e21bf653-dfe1-4d81-b3d3-795cb104066e
- Firewall access to manipulate external VMs via remote desktop (out-going connections via TCP port 3389 must be enabled).
Part one: Set up the Azure infrastructure
Create an Azure affinity group
An affinity group in Azure is mechanism for grouping resources that have to collaborate closely. It will, among other things, guarantee a degree of regional proximity for services. Everything we set up here will use the same affinity group.
In the Windows Azure Management Portal select Settings from the side bar
- On the Settings page, select the Affinity Groups tab on the top navigation bar.
- Click the +ADD button on the bottom navigation bar.
- On the Create Affinity Group form, enter the following details:
- Name: adtestaffinity
- Region: Select the Azure data centre where you want to this infrastructure to be based.
Create a new Azure Storage Account
We will leverage Azure’s storage service to will ensure that the Active Directory database is on a highly-available drive.
- To create a new storage account click the +NEW button on the bottom toolbar in the Azure Management Portal and select Data Services > Storage > Quick Create.
- Enter the following details:
- URL: adteststorage
- Region/Affinity Group: Select the affinity group created above, i.e. adtestaffinity.
- Enable Geo-Replication: Leave the default option, i.e. selected.
- Click the CREATE STORAGE ACCOUNT button to create the account.
Register a DNS server
The VM will act as a domain controller so will need to register the internal IP address that it will be using for Active Directory-integrated Dynamic DNS services.
- Click the +NEW button on the bottom toolbar in the Azure Management Portal and select Network Services > Virtual Network > Register DNS Server.
- Complete the fields as shown:
- Name: adtestdns
- DNS Server IP Address: 10.0.0.4
- Click the REGISTER DNS SERVER button.
Define a virtual network
The Active Directory will need to run under a virtual network created in Azure.
- Click the +NEW button on the bottom toolbar in the Azure Management Portal and select Networks > Virtual Network > Quick Create.
- Complete the fields as follows:
- Name: adtestnetwork
- Address Space: 10.—.—.—
- Maximum VM Count: 4096 [CIDR: /20]
- Affinity Group: Select the Affinity Group defined above, i.e. adtestaffinity.
- DNS Server: Select the DNS Server registered above, i.e. adtestdns.
- Click the Create a virtual network button.
Part two: Set up an Azure VM with Active Directory
Provision the VM in Azure
Now we are ready to create the virtual machine in Azure that will act as our identity store.
- Click the +NEW button on the bottom toolbar in the Azure Management Portal and select Compute > Virtual Machines > From Gallery. The VM wizard will open.
- In the operating system list, select Windows Server 2012 Datacenter and click the Next arrow button.
- On the Virtual Machine Configuration page, complete the fields as follows:
- Version Release Date: Select the most recent release date
- Virtual Machine Name: adtestadvm01
- Size: Small (1 core, 1.75GB Memory)
- New User Name: This is the local administrator account – choose a unique name (i.e. not “Administrator”)
- New Password and Confirm Password fields: Choose a very strong password as this is your local administrator password.
- Click the Next button to continue.
- On the Virtual Machine Mode page, complete the fields as follows:
- Cloud service: keep the default “Create a new cloud service” option.
- DNS Name: adtestadvm01.cloudapp.net
- Region/Affinity Group/Virtual Network: Select the virtual network defined above, i.e. adtestnetwork.
- Virtual Network Subnets: Keep the default option, i.e. Subnet-1 (10.0.0.0/23)
- Storage Account: Select the Storage Account defined above, i.e. adteststorage
- Availability set: Leave this option at “(none)”.
- Click the Next button to continue.
- On the Virtual machine configuration page, you will want to add another end point to enable HTTPS connectivity to and from the server.
- In the drop down list select HTTPS – it should create a new row in the table where the “public port” and “private port” fields both read 443.
- Create another row by selecting HTTP from the drop-down list. This row should have 80 in both the “public port” and “private port” columns
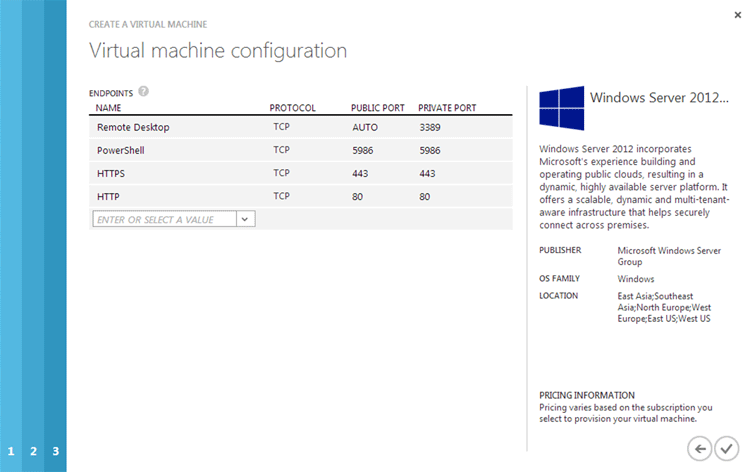
Click the Next button to start provisioning the VM. This will take a while to complete – up to 10 minutes.
Connect to the VM for the first time
Once provisioning is complete, open the details page for the VM in the Azure Management Portal by clicking on the name displayed on the Virtual Machines page.
On the virtual machine details page for adtestadvm01, click the Connect button located on the bottom toolbar and click the Open button to launch a Remote Desktop Connection to the VM. You will need to local administrator credentials entered while setting up the VM.
Attach the VM to an empty disc drive
The Active Directory database will be held on a disc drive based on the Azure Storage account that we created earlier.
In the Azure Management Portal, go to the virtual machine details page for adtestadvm01 and click the Attach button found on the bottom toolbar.
Select Attach Empty Disk and complete the following fields on the form that appears:
- File name: adtestadvm01-data01
- Size: 10 GB
- Host Cache Preference: None
Click the Tick button to create and the new virtual hard disk and attach it to the VM.
This may take a few minutes to provision and be visible to the VM.
Format the empty disc drive on the VM
Once the disc has been attached you can format it directly on the server using Computer Manager.
- Connect to the VM adtestadvm01 using a remote desktop connection.
- In the Server Manager window, click on the Tools menu on the top navigation bar and select Computer Management.
- In the Computer Management window, click on Disk Management in the left navigation pane.
- When prompted with the Initialize Disk dialog box, click the OK button to continue leaving the default options in place.
- Right-click on the unallocated disk space on Disk 2 and select New Simple Volume… from the pop-up menu.
- In the New Simple Volume Wizard, click the Next button on each page to accept all default values.
- Click the Finish button on the last page of the wizard to create a new F: drive.
- When the new volume has finished the formatting process, close the Computer Management window.
Configure a Windows Server Active Directory Forest in the VM
The VM is ready to configure as a domain controller running Active Directory. This involves adding the Active Directory Domain Services role to the server.
- Connect to the VM adtestadvm01 using remote desktop and start Server Manager. Select the Add roles or features link in the Quick Start section.
- In the dialog box click the Next button three times to advance to the list of Roles that you can install.
- In the list of roles, select the checkbox for the Active Directory Domain Services role. A dialog box will open – just click the Add Features button.
- Click the Next button accepting the default settings until you advance to the Confirm installation selections page of the wizard.
- Click the Install button to begin the installation process.
When the installation of Active Directory Domain Services has completed, do not click the Close button. Instead, click the link titled Promote this server to a domain controller as highlighted below.
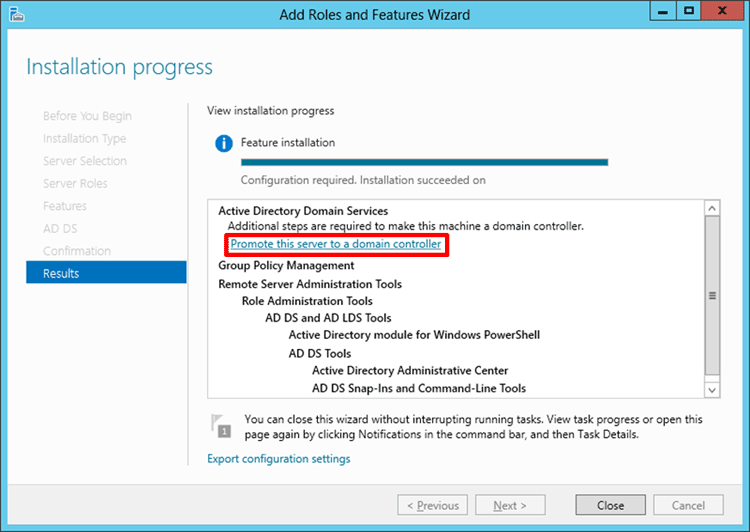
This will launch the Active Directory Domain Services Configuration Wizard.
- In the Deployment Configuration page of the wizard, select the deployment operation for Add a new forest.
- In the Root domain name field, enter adtestsso.com. Click the Next button.
- On the Domain Controller Options page of the wizard, enter and confirm a recovery password in the Directory Services Restore Mode (DSRM) password fields. Click the Next button.
- On the DNS Options page of the wizard, ignore the warning message about not being able to find the “authoritative parent zone” and click the Next button to continue.
- On the Additional Options page of the wizard, accept the default value for NetBIOS domain name and click the Next button.
- On the Paths page of the wizard, change the Database folder, Log files folder and SYSVOL folder paths to point to the Azure storage disc – i.e. they should begin with F: instead of C:. Click the Next button.
- On the Review Options page, click the Next button.
- On the Prerequisites Check page, ignore the warnings displayed and click the Install button. The warnings displayed are due to the dynamic IP addressing used within Windows Azure Virtual Networks and do not apply to this cloud environment.
The Active Directory Domain Services configuration process will be begin for the new AD Forest. It will take some time and re-boot the server automatically as part of the installation process.
Add a test user
The first logins you create for the identity server have to be created directly through the VM. Create a new user account now to use in testing later on.
- In Server Manager on the VM adtestadvm01 right-click on Tools and select Active Directory Users and Computers.
- When the dialog opens, expand the domain node (adtestsso.com) in the left-hand pane and right-click on the Users option. Click on New > User.
- Add in details for the First Lame, Last name and a User login name fields. Click on Next.
- Enter and confirm a password. Ensure that the “User must change password at next logon” option is unchecked. Click on Finish.
Part three: Configure the VM as an identity server
Install and configure IIS
ADFS 2.0 needs IIS to deliver features such as the login page.
- Connect to the VM adtestadvm01 using remote desktop and start Server Manager. Select the Add roles or features link in the Quick Start section.
- In the dialog box click the Next button three times to advance to the list of Roles that you can install.
- In the list of roles, select the checkbox for the Web Server (IIS) role. A dialog box will open – just click the Add Features button.
- Click the Next button accepting the default settings until you advance to the Confirm installation selections page of the wizard.
- Click the Install button to begin the installation process.
- When the install is completed, click on Close. A reboot will not be required.
Create an SSL certificate
ADFS uses HTTPS and we will be using a self-signed certificate for this exercise. This will give rise to some SSL warnings when accessing the services but it will be sufficient to prove the functionality.
- In the Server Manager window, click on the Tools menu on the top navigation bar and select Internet Information Services (IIS) Manager.
- Click on the server node in the left-hand pane. A dialog will open asking about Web Platform Installer – just click on No to close it.
- Double-click on the Server Certificates icon in the main screen area.
- In the right-hand Actions pane click on the Create Self-Signed Certificate option.
- Enter “adtestadvm01.cloudapp.net” in the friendly name field and select “Web Hosting” in the certificate store drop-down.
- Click on OK to create the certificate. This certificate will be used when you configure ADFS.
- In Server Manger s elect the Add roles or features link in the Quick Start section.
- In the dialog box click the Next button three times to advance to the list of Roles that you can install.
- In the list of roles, select the checkbox for the Active Directory Federation Services role. A dialog box will open – just click the Add Features button.
- Click the Next button accepting the default settings until you advance to the Confirm installation selections page of the wizard.
- Click the Install button to begin the installation process.
- When the install is completed, click on Close. A reboot will not be required.
- In the Server Manager window, click on the Tools menu on the top navigation bar and select AD FS Management.
- Click on the AD FS Federation Server Configuration Wizard link – this will open a new dialog.
- On the Welcome page keep the “Create a new Federation Service” option selected and click on Next.
- On the Select Deployment Type page keep the “New Federation Server” option selected and click on Next.
- The SSL certificate created above should be selected on the Federation Service Name page. Click on Next.
- Select the local administration account as the Service account and enter the password. Click on Next.
- Click on Next to start the configuration process – this will take a few minutes.
Install ADFS 2.0
Configure ADFS 2.0 for the first time
Adjusting the service properties
The default ADFS service properties will not send the correct federation data to Azure ACS. They will pass the Active Directory namespace (i.e. adtestsso.com) as the identity store URL rather than the ADFS service URL. This can be adjusted through the ADFS settings that are used in writing the federation metadata.
- In the Server Manager window, click on the Tools menu on the top navigation bar and select AD FS Management.
- When the ADFS snap-in opens, click on Edit Federation Service Properties… from the right-hand Actions pane.
- Ensure that the Federation Service name field is the same as the server URL, i.e. adtestadvm01.cloudapp.net.
- Click on OK.
Part four: Configure Azure ACS to act as a federation broker
Set up a new instance of Azure ACS
Firstly, create a new ACS namespace that will act as the federation broker for the application.
- Click the +NEW button on the bottom toolbar in the Azure Management Portal and select App Services > Active Directory > Access Control > Quick Create.
- Enter adtestacs as the namespace.
- Select a region that is consistent with the affinity group you created above.
- Click on the Create button.
- To configure the ACS service select Active Directory from the left-hand toolbar and Access Control Namespaces from the top-level menu. Select the instance created above and click on the Manage button on the bottom tool-bar.
- This will open the Access Control Service portal from the old Azure Management Portal where ACS is configured.
Note that there may be a lengthy delay before the management portal is available for your new namespace, even if Azure if reporting the namespace as fully provisioned.
You will need to make a note of the WS-Federation metadata endpoint for the service so you can establish a trust relationship with the ADFS service. In the left-hand menu click on the Application Integration menu item. The main area will display a series of entries in the Endpoint Reference section, including the WS-Federation Metadata endpoint which will be of the form:
https://[namespace].accesscontrol.windows.net/FederationMetadata/2007-06/FederationMetadata.xml
Configure a trust relationship between Azure ACS and ADFS
Now that we have an identity server and a federation broker we have to establish a two-way trust relationship between them.
The first step will be to configure the relationship on the ADFS server.
- Connect to the VM adtestadvm01 using remote desktop and start Server Manager.
- In the Server Manager window, click on the Tools menu on the top navigation bar and select AD FS Management.
- Click on the Add a trusted relying party link in the main pane. This can also be done via a link on the right-hand Actions pane.
- When the Add Relying Party Trust Wizard opens click on the Start button.
- In the Federation metadata address text box you will need to add the WS-Federation metadata endpoint for the Azure ACS service. This will be in the following format:
https://[namespace].accesscontrol.windows.net/FederationMetadata/2007-06/FederationMetadata.xml
- Click on Next.
- Accept all the remaining default options by clicking on Next several times.
- At the end of the wizard there will be a checkbox labelled “Open the Edit Claims Riles dialog…” – you can uncheck this before clicking on Close.
- A similar trust relationship also has to be established in the ACS management portal.
- Download the federation metadata from the ADFS server – the URL will be in the following format:
https://[server name].cloudapp.net/FederationMetadata/2007-06/FederationMetadata.xml
- Accessing this file will give rise to an SLL error that you can ignore.
- Open the management console for the ACS namespace via the Azure Management Portal.
- Select Identity Providers from the left-hand menu.
- Click on the Add link towards the top of the page.
- Select the “WS-Federation identity provider” option and click on Next.
- In the Display name field enter the URL of the ADFS server, i.e. adtestadvm01.cloudapp.net.
- In the WE-Federation metadata section click on the Choose File button and select the meta data file downloaded from the ADFS server.
- Enter “ADFS Identity Store” into the Login link text field – this is what will be displayed to users.
- Click on Save.
Setting up the name identifier claim
Different identity providers tend to return different sets of claims. If you are planning to use more than one identity provider in the long term you can only really rely on the Name Identifier claim to uniquely identify users. To make sure the ADFS identity store conforms to this it has to be configured to return a unique username for the following claim:
http://schemas.xmlsoap.org/ws/2005/05/identity/claims/nameidentifier
This can be done by adding a claim rule in the ADFS server.
- Connect to the VM adtestadvm01 using remote desktop and start Server Manager.
- In the Server Manager window, click on the Tools menu on the top navigation bar and select AD FS Management.
- In the left-hand pane, expand the nodes and select Relying Party Trusts from the Trust Relationships node. The address of the Azure ACS instance will appear in the main panel.
- Right-click on the name of the Azure ACS instance and click on Edit Claim Rules…
- Click on Add Rule…
- Select “Send LDAP Attributes as Claims” and click on Next.
- Enter “Map User-Principal-Name to User ID” in the Claim rule name field.
- Select Active Directory in the Attribute store drop-down list.
- In the mappings grid, enter User-Principal-Name into the “LDAP Attribute” column and Name ID into the “Outgoing Claim Type” column.

- Click on Finish.
- Click on OK to leave the Claim Rules dialog.
Allowing claims to be passed through Azure ACS
Now that we have configured the ADFS server to send the correct claims we have to ensure that Azure ACS passes them through to any application. This is done by creating a rule group in Azure ACS.
- Open the management console for the ACS namespace via the Azure Management Portal.
- Select Identity Providers from the left-hand menu.
- Click on the Add link towards the top of the page.
- Enter “adtestadvm01.cloudapp.net” into the Name field. Click on Save.
- Click on Add to create a new rule for the group.
- Accept all the default values as these will allow any claims to pass through. Click on Save.
Part five: Set up a website to log in using federated identity
Create the MVC website in Visual Studio
The Windows Identity Federation is written into version 4.5 of the .Net framework, so integration a website with Azure ACS is very straightforward. It just requires the application to be registered as a relying party application in Azure.
The application we create will just display a single page that logs a user in and shows the claims associated with their identity.
- In Visual Studio 2012 create a new ASP.NET MVC 4 web application. Choose Internet Application as the project type.
- Run the application to check that it works and displays the home page – take a note of the application URL.
To link the application up to Azure ACS you will need the management key from your ACS instance. This can be collected from the Azure ACS Management Portal.
- Click on Management service in the left-hand menu.
- Click on the Management client link
- In the Edit Management Service Account screen click on the Symmetric Key link towards the bottom of the screen.
- Click on Show Key and copy the content – it should be a long security key.
The next step is to link the web application to Azure using the management key you have just collected.
- In Visual Studio Solution Explorer, right-click on the project and select Identity and Access…. (Note that this requires the Identity and Access Tool extension listed as a pre-requisite at the start of this guide).
- In the dialog that opens select the “Use the Windows Azure Access Control Service” option.
- Click on the Configure… link in the middle of the screen.
- Enter the ACS namespace – i.e. adtestacs (not the fully qualified domain name)
- Enter the management key and ensure that the “Save management key” option is checked.
- Click on OK to register the application with Azure.
- The available identity providers for the Azure ACS instance will be displayed in a list. Select qasadvm01.cloudapp.net and click on OK.
The wizard will now write the required configuration into the site’s web.config file and register it as a relying application in Azure ACS. You can check the configuration in the Azure ACS management portal by selecting the Relying party applications left-hand menu option.
Run the application to test the connection. You will see an error caused by the self-signed SSL certificate but this should be ignored at this stage.
Once past the certificate error you should be challenged to enter a username and password – use the fully qualified Active Directory username here – i.e. [email protected].
Configuring the login experience
By default ADFS 2.0 will just cause the browser to show a system login dialog. You can configure it to display a set of web pages that are installed as part of ADFS 2.0 and hosted in IIS.
- Connect to the VM adtestadvm01 and open the web.config file found in the following location:
C:\inetpub\adfs\ls
- Look for the localAuthenticationTypes element and move the Forms element to be first in the list, i.e.
<localAuthenticationTypes>
  <addname="Forms"page="FormsSignIn.aspx" />
  <addname="Integrated"page="auth/integrated/" />
  <addname="TlsClient"page="auth/sslclient/" />
  <addname="Basic"page="auth/basic/" />
</localAuthenticationTypes>
- You can now adjust the login experience by changing the website files in the same location.